
Tools
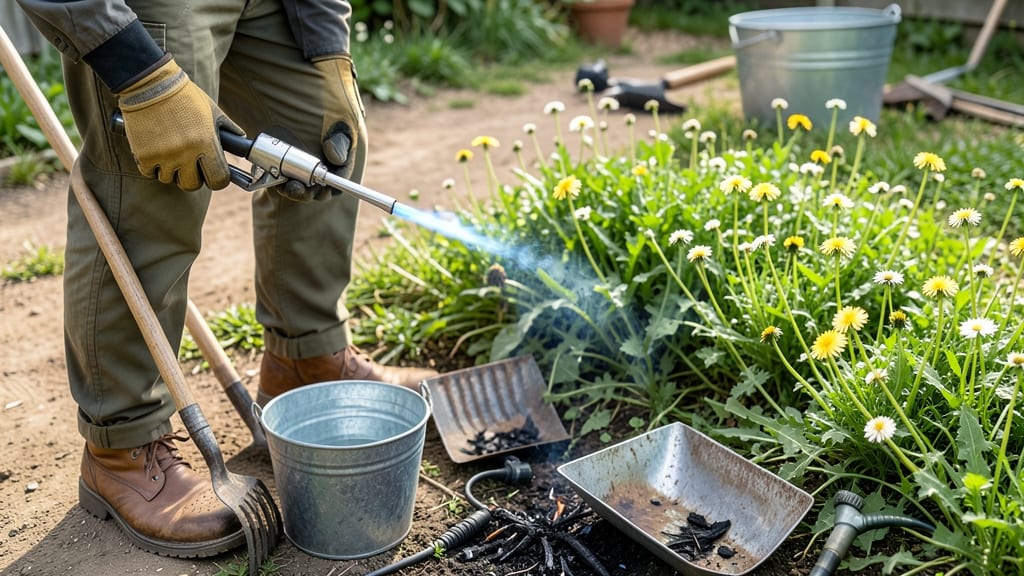
Burning weeds in the garden saves hours of digging and chemical use—but it’s not as simple as lighting a match. I’ve used a propane torch to clear stubborn weeds from my driveway cracks and patio edges, and the results are instantly satisfying.
The key is timing, technique, and knowing when to put the flame away for good. You’ll need a propane-powered weed burner (rent or buy), protective gloves, and a water source nearby. Avoid windy days—embers can travel 50+ feet—and never burn near flammable materials like mulch or dry leaves.
The right tool makes all the difference between a quick cleanup and a smoky mess. Once you master the technique, you’ll see weeds shrivel up in seconds, with no regrowth. The smell of singed weeds fades quickly, leaving behind clean soil ready for planting.
Just remember: this method works best on young, green weeds, not thick, woody invasives. Before you light up, check local burn laws—some areas ban open flames entirely. For eco-friendly alternatives, try vinegar sprays or smothering weeds with cardboard.
Flame-based eradication has its place, but it’s not the only tool in your weed-fighting arsenal.
📚 In This Guide
- What you need
- Instructions
- Tips and common mistakes
- Wrapping up and next steps
What you need
- ● Propane torch or weed burner: Look for a handheld, adjustable-flame torch with a 10-20 ft. hose (e.g., Weed Dragon or Weed Torch Pro). Choose one with a safety shut-off valve.
- ● Propane tank: A 20 lb. refillable tank (ensure it’s clean and leak-tested). Avoid empty or damaged tanks!
- ● Fire-resistant gloves: Leather or heat-resistant garden gloves (rated for 500°F+) to protect hands.
- ● Safety goggles: ANSI-rated goggles to shield eyes from debris and flames.
- ● Long-sleeved shirt and pants: Made of natural fibers (cotton/wool)—avoid synthetics (they melt!).
- ● Water source (bucket or hose): A 5-gallon bucket of water or garden hose for emergencies.
- ○ Fire extinguisher (optional but critical): A Class A or ABC-rated extinguisher (rated for 2A:10BC or higher).
- ● Wind meter or anemometer: To check wind speeds (under 5 mph is ideal).
- ● Windbreak: A foldable screen or tarp to block wind if needed.
- ● Weed barrier cloth: Lay down cardboard or landscape fabric to protect nearby plants.
- ● Long-handled tool: A garden rake or hoe to clear debris after burning.
- ● Smoke mask or respirator: For sensitive lungs (especially in dry conditions).
- ● Fireproof mat: Place under the torch to catch stray embers.
Step-by-Step guide to flame-based weed eradication
This method clears weeds fast while protecting your garden soil—no digging required.
Gather the Right Flame Tool and Safety Gear
Choose a propane-powered weed burner with a 10-20 foot hose for reach. I recommend a model with adjustable flame intensity—low for delicate areas, high for thick weed patches. Always pair it with heat-resistant gloves, safety goggles, and a long-sleeved shirt to protect against heat and debris. Check your local regulations first; some areas restrict open-flame tools.
Fill the propane tank before starting—never refill while hot. A full tank ensures you can cover the entire area without interruptions. Keep a fire extinguisher nearby, even for small jobs. I also bring a garden hose to have on hand for any unexpected flare-ups.
Prepare the Garden for Safe Burning
Clear the area of flammable materials—remove dry leaves, mulch, or wood chips within 10 feet of your target zone. Focus on mature weeds first; young shoots are easier to pull by hand. Water the soil around desired plants (not weeds) if they’re drought-sensitive—damp soil conducts heat poorly, protecting roots.
Work on a calm, dry day—wind speeds over 5 mph can spread embers unpredictably. I like to burn in the early morning when humidity is highest and weeds are most hydrated. Avoid burning when temperatures exceed 90°F, as the heat can stress nearby plants.
Apply the Flame Strategically to Weeds
Hold the flame 1-2 inches above the weed tops and move it in slow, steady strokes—like mowing. For thick patches, pass over the area 2-3 times to ensure the entire plant heats up. You’ll see weeds wilt instantly and turn brown; this means the roots are dying too. Avoid lingering on one spot—overheating can char soil and harm future plantings.
Start with the outer edges of the area and work inward. This prevents accidentally missing spots near your starting point. For weeds growing near shallow-rooted plants, use the lowest flame setting to minimize heat transfer. Watch for smoke or popping sounds—these signal roots are being destroyed.
Monitor and Repeat as Needed
New weeds may sprout within 5-7 days, but their growth will be stunted. Reapply the flame to any survivors before they seed. I schedule a follow-up session 10 days later to catch regrowth. After treatment, water the area lightly to help soil recover—this also washes away any residual char.
For persistent weeds like dandelions or thistles, you may need 3-4 treatments. The key is consistency: heat weakens roots over time, but a single pass won’t always kill them. If weeds keep returning, consider mulching the area afterward to suppress future growth.
Protect Your Garden After Burning
Wait 24 hours before replanting or tilling the area. The soil will be warmer than usual, which can stress new seedlings. If you’re planting immediately after, water deeply to cool the soil and encourage root establishment. Avoid burning within 2 feet of wood structures, fences, or other flammable materials—even small embers can cause fires.
Use the cleared space for heat-loving plants like okra, sweet potatoes, or melons—the residual warmth can give them a head start. For cooler-season crops, wait until the soil temperature drops back to normal. I always keep a small fan nearby when working near sensitive plants to dissipate excess heat.
Tips & tricks for effective flame-based weed control
Mastering this weed-burning technique takes practice, but these insights will help you avoid common pitfalls and get the best results.
Heat Application Technique: When applying the flame in Step 3, focus on the base of the weed stems rather than just the leaves. This is where the roots absorb the heat most effectively. I’ve found that a second pass with the flame—after the weeds have wilted—ensures the roots are fully compromised. The goal is to see the weeds collapse completely, not just brown at the tips.
Weather Window Matters: The instructions mention working on calm days, but I’ve learned that relative humidity is just as important as wind speed. Weeds are most hydrated in the early morning, making them less flammable but also more responsive to heat treatment. If humidity drops below 40%, weeds dry out faster and may not absorb enough heat to kill the roots. Check a weather app for both wind speed and humidity before you start.
Equipment Upgrade: While the instructions cover basic safety gear, I recommend adding a small handheld fan to your toolkit. It’s invaluable for dissipating excess heat near sensitive plants. I keep mine running on low when working near vegetables or flowers—it creates a cooling barrier without disturbing the plants. This is especially helpful when using the highest flame setting on thick weed patches.
Follow-Up Strategy: The instructions suggest a 10-day follow-up session, but I’ve found that 7 days is often enough for most weeds. The key is to watch for new sprouts rather than sticking to a rigid schedule. If you see any regrowth, treat it immediately—weeds grow fastest when they’re young, and a second pass is much easier than a third. For stubborn weeds like dandelions, I’ve had success with three treatments spaced 5 days apart.
Pro Tips for Burning Weeds In Garden
- Mastering this weed-burning technique takes practice, but these insights will help you avoid common pitfalls and get ...
- Heat Application Technique: When applying the flame in Step 3, focus on the base of the weed stems rather than just t...
- Weather Window Matters: The instructions mention working on calm days, but I’ve learned that relative humidity is jus...
Frequently asked questions
Got questions about burning weeds in your garden? You’re not alone—this method sparks curiosity (and sometimes concerns!). Below, we tackle the most common queries to help you flame up your weed control safely and effectively.
When is the best time of day to burn weeds?
The ideal window is early morning or late afternoon when winds are calm and humidity is higher. Avoid midday when temperatures soar and fire risks spike. Pro tip: Check local burn bans—some areas restrict open flames entirely. Always prioritize safety over timing!
Is burning weeds legal in my area?
Laws vary widely! Many regions require permits for open burning, especially during dry seasons. Double-check with your local fire department or agricultural extension office. If in doubt, opt for propane torches (often legal) or manual removal. When in doubt, don’t burn it out—call first!
Will burning weeds harm my plants or soil?
Direct flames can damage nearby plants, so keep a safe buffer (at least 1–2 feet). For soil, occasional burning is low-risk, but avoid overdoing it—excessive heat can deplete organic matter. Mulch or compost afterward to restore nutrients. Warning: Never burn weeds with chemical treatments (toxic fumes!).
What’s the safest way to burn weeds without a fire risk?
Start small with a propane-powered weed torch (like the Weed Dragon or Torch In models). Use a fire-resistant container (like a metal bucket with a lid) for contained burns. Key steps:
- Clear debris first (dry leaves fuel fires!).
- Keep a hose or bucket of water nearby.
- Never leave burning weeds unattended.
Are there better alternatives to burning weeds?
Try these low-flame options:
- Manual removal: Dig or pull weeds (best for small areas).
- Vinegar spray: Mix 1 gallon vinegar + 1 cup dish soap for a natural herbicide.
- Smothering: Cover weeds with cardboard or mulch for 4–6 weeks.
- Flame weeding tools: Electric or battery-powered torches (zero open flame!).
For stubborn weeds, combine methods—e.g., smother first, then flame or pull.
What do I do if the fire spreads unexpectedly?
Stay calm and act fast:
- Drop to the ground and smother flames with dirt or a blanket.
- Use water to extinguish (never throw it on burning oil!).
- Call emergency services if flames grow beyond control.
Prevention tip: Never burn on windy days or near dry grass. When in doubt, skip the flame and try another method!
Wrapping up and next steps
Burning weeds in your garden can be an effective way to clear stubborn invaders without breaking a sweat—but always prioritize safety and local regulations. Whether you’re using a propane torch, flame weeder, or controlled fire, the key is precision and preparation.
Now that you’re armed with the right tools and knowledge, take action! Grab your gear, follow the steps carefully, and reclaim your garden one flame at a time. Happy (and safe) weeding! 🌱🔥
- Next step: Start small—test your method on a patch of weeds before tackling larger areas.
- Pro tip: Keep a fire extinguisher or water source nearby for extra peace of mind.