
Container Gardens
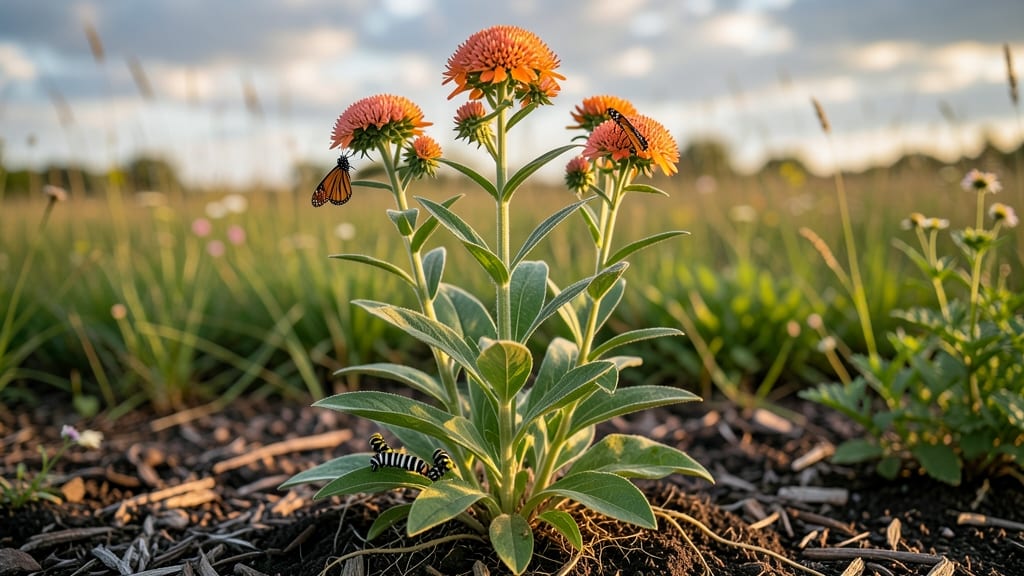
Milkweed thrives best when you nail the growing conditions—sunny spots where it can soak up at least 6 hours of direct sunlight daily—that’s the secret to those vibrant blooms that monarch butterflies can’t resist. 🌞 I’ve seen milkweed struggle in shady corners, but give it full sun, and it grows tall, sturdy, and packed with nectar-rich flowers.
The key isn’t just sunlight, though—it’s how that sun interacts with well-drained soil, which keeps roots happy and prevents rot. The soil needs to breathe, so avoid heavy clay unless you’re amending it with sand or compost.
A mix of native soil, sand, and a little organic matter works wonders for most milkweed varieties. Watering is simple: keep the soil moist but never soggy, especially in the first few weeks after planting. Once established, milkweed is surprisingly drought-tolerant—just don’t let it dry out completely.
You’ll notice the difference within weeks: lush, velvety leaves and clusters of pink, purple, or white flowers that attract pollinators like magnets. The best part? Milkweed spreads easily, so you’ll soon have patches of it popping up naturally in your garden.
Just give it space—these plants can grow 3 to 5 feet tall, depending on the variety. For regional adaptability, native species like Asclepias tuberosa (butterfly weed) or Asclepias syriaca (common milkweed) thrive in their local climates with minimal fuss.
Pair it with wildflowers or grasses for a low-maintenance, pollinator-friendly garden that hums with life all season. Let’s get those monarchs visiting!
📚 In This Guide
- What you need
- Instructions
- Tips and common mistakes
- Wrapping up and next steps
What you need
- ● Milkweed seeds or plants: Choose native species like Asclepias tuberosa (butterfly weed) or Asclepias syriaca (common milkweed). Buy from reputable seed suppliers (e.g., Native American Seed or local nurseries). Quantity: 5–10 seeds per container or 10–20 seeds per square foot in garden beds.
- ● Well-draining potting mix: Use a blend designed for succulents or cacti (e.g., Miracle-Gro Cactus, Palm & Citrus Mix). Quantity: 1–2 gallons per 12-inch container.
- ○ Containers (optional but ideal for small spaces): 5–10 gallon fabric grow bags or terracotta pots (for better drainage).
- ● Ensure pots have drainage holes (critical to prevent root rot!).
- ● Native or adapted soil: If planting outdoors, amend heavy clay soil with compost (2–3 inches mixed into the top 12 inches of soil) and perlite or coarse sand (10–20% by volume) for drainage.
- ● Watering can or hose with a gentle spray nozzle: Milkweed hates soggy roots!
- ● Gloves and pruners: For handling seeds/plants and light maintenance.
- ○ Seed-starting kit: Includes seed trays, heat mat (optional for faster germination), and a humidity dome.
- ● Slow-release fertilizer (5-10-5 or organic options): Sprinkle lightly at planting time (follow package rates).
- ● Mulch (straw or shredded leaves): Helps retain moisture and suppress weeds. Apply 1–2 inches around plants.
- ● Stakes or cages: For taller varieties (e.g., Asclepias syriaca) to support stems.
- ● Soil pH test kit: Milkweed prefers slightly alkaline soil (pH 6.0–7.5). Adjust with lime if needed.
- ○ Ladybugs or neem oil: Optional pest deterrent for aphids or spider mites.
Step-by-Step guide to perfect milkweed growing conditions
Here’s how to create the ideal environment for thriving milkweed—where monarchs will thank you.
☀️ Step 1: Select the Sunniest Spot in Your Garden
Milkweed demands full sun—at least 6-8 hours of direct sunlight daily. I always scout my garden first for the brightest, most exposed area, usually a south- or west-facing slope. Avoid spots where trees or buildings cast shade after noon, as milkweed needs intense light to develop its iconic flower stalks.
Watch for subtle signs: if your potential spot has neighboring perennials struggling with pale leaves or leggy growth, it’s not sunny enough. Milkweed’s deep green, upright stems will tell you immediately when it’s happy—no compromise here. If you’re working with a shadier site, choose Asclepias tuberosa (butterfly weed), which tolerates partial sun better than swamp milkweed varieties.
🪴 Step 2: Prepare Well-Drained Soil with Ample Space
Milkweed roots despise soggy conditions—well-drained soil is non-negotiable. Before planting, amend heavy clay with 2-3 inches of coarse sand or perlite mixed into the top 12 inches of soil. I like to dig a 12-inch-deep hole, fill it halfway with amended soil, then place the plant so the crown sits 1 inch above ground level. This prevents rot during spring rains.
Space plants 3-5 feet apart—milkweed spreads aggressively, and crowded roots compete for nutrients. If your garden is small, opt for Asclepias incarnata (swamp milkweed), which stays slightly more compact. Test drainage by digging a hole, filling it with water, and watching how quickly it drains: if it takes more than 30 minutes, improve the soil further.
💧 Step 3: Water Deeply but Sparingly After Establishment
Newly planted milkweed needs 1 inch of water weekly for the first 4-6 weeks to encourage root growth. After that, water only when the top 2 inches of soil feel dry—overwatering is the #1 killer. I use a soaker hose set to low flow for 20 minutes twice a week, keeping water at the base to avoid fungal issues on leaves.
Mature milkweed is drought-tolerant once established, but deep watering (every 10-14 days) during dry spells keeps stems sturdy. You’ll know it’s thriving when it sends up tall, unbroken flower stalks by mid-summer—no wilting or yellowing leaves. If your soil stays wet for days, consider raised beds or mounds to improve drainage.
✂️ Step 4: Prune Strategically for Health and Pollinators
Deadhead spent flower clusters in late summer to redirect energy into next year’s growth, but leave seed pods for monarchs. I snip 1-2 inches above the next set of leaves with clean pruners, avoiding the main stem. In early spring, cut back one-third of the plant’s height to encourage bushier growth—this prevents leggy stems and improves airflow.
Never prune in fall or winter, as milkweed stores nutrients in its roots. If you notice blackened stems or mushy leaves, it’s a sign of overwatering or fungal issues. Remove affected parts immediately and improve drainage. Healthy milkweed should have fewer than 5% damaged leaves by mid-season.
🌿 Step 5: Monitor for Pests and Adjust Care
Milkweed’s only real pest is the milkweed beetle, which feeds on leaves but rarely kills the plant. I handpick adults and larvae, dropping them in soapy water. For aphids, blast them off with a strong stream of water—milkweed’s sap deters most insects naturally. Avoid chemical sprays, as they harm monarch caterpillars.
If leaves turn yellow between veins, it’s iron deficiency—amend soil with chelated iron in early spring. For white, powdery growth, reduce overhead watering and apply neem oil sparingly. A thriving milkweed plant should have vibrant green foliage and multiple flower stalks by July, with monarchs already laying eggs on its leaves.
Tips & tricks for perfect milkweed cultivation
Here's what nobody tells you about creating the perfect habitat for milkweed—these are the tricks that separate struggling plants from thriving monarch magnets.
Sunlight Strategy: The 6-8 hours of direct sunlight requirement isn't just about quantity—it's about quality. I've found that morning sun (east-facing) combined with afternoon sun (west-facing) creates the ideal light spectrum for milkweed development. If your garden has afternoon shade, consider adding a reflective surface like a white fence or mulch to bounce extra light onto the plants during critical growth periods.
Soil Science: When testing drainage in Step 2, I recommend going beyond the 30-minute water test. For heavy clay soils, dig a deeper test hole (18 inches) and observe how water moves through different soil layers. If water pools at any depth, you'll need to create raised beds or install drainage pipes. The crown sitting 1 inch above ground level is crucial—this prevents rot during those inevitable spring downpours we all experience.
Watering Wisdom: The 1 inch weekly watering guideline for the first 4-6 weeks might seem straightforward, but timing matters. I've learned to water in the early morning (before 8 AM) to prevent fungal issues. For the 20-minute soaker hose sessions, split them into two 10-minute sessions with a 30-minute break—this mimics natural rainfall patterns and encourages deeper root growth. Once established, let the soil dry completely between waterings to build drought tolerance.
Pruning Precision: When deadheading in late summer, I use a different approach than most gardeners. Instead of cutting back to the base, I make angled cuts 1-2 inches above leaf nodes—this creates more entry points for next year's growth while still redirecting energy. For the early spring pruning, I mark one-third of the plant's height with a ribbon before cutting to ensure consistent pruning every year. This visual cue prevents over-pruning, which can stress the plant.
Pro Tips for Milkweed Growing Conditions
- Here's what nobody tells you about creating the perfect habitat for milkweed—these are the tricks that separate struggling plants from thriving monarch magnets.
- Sunlight Strategy: The 6-8 hours of direct sunlight requirement isn't just about quantity—it's about quality.
- Soil Science: When testing drainage in Step 2, I recommend going beyond the 30-minute water test.
Frequently asked questions
Got questions about growing milkweed? You’re not alone! Here are answers to the most common concerns—from soil to timing—to help you nurture thriving plants for monarch butterflies and your garden.
What’s the best soil type for milkweed?
Milkweed thrives in well-drained soil—think sandy loam or clay amended with compost. Avoid soggy spots (it hates "wet feet"). In containers, use a mix of 50% potting soil, 30% perlite, and 20% compost to mimic its native, rocky habitats. Pro tip: Add a handful of grit (like coarse sand) to improve drainage!
How much sun does milkweed need daily?
Full sun is key! Aim for 6–8 hours of direct sunlight per day. In hot climates, light shade (especially afternoon shade) prevents wilting. If your garden is shady, try tropical milkweed (Asclepias curassavica), which tolerates partial shade better than native species like Asclepias tuberosa.
When is the best time to plant milkweed?
Plant seeds or transplants in early spring (after the last frost) or late summer (for fall blooms). Seeds germinate best when scarified (nick the seed coat) and kept moist in warm soil (70–80°F). Transplants can go in year-round in mild climates, but avoid extreme heat or cold.
Can I grow milkweed in containers?
Use 5-gallon pots or larger (milkweed has deep roots). Ensure pots have drainage holes and elevate them if your area floods. Dwarf varieties like Asclepias incarnata (‘Cinderella’) are perfect for containers. Pro tip: Rotate pots occasionally for even growth!
Why are my milkweed leaves turning yellow?
Yellow leaves usually signal overwatering or poor drainage. Let soil dry slightly between waterings, and check for root rot (mushy stems). If leaves curl or wilt in heat, mulch with straw to retain moisture. Pests like aphids can also cause yellowing—spray with soapy water if needed.
Is there a milkweed alternative for allergies?
If you’re sensitive to milkweed’s latex sap, try non-toxic natives like bee balm (Monarda) or purple coneflower (Echinacea). These support pollinators without the allergy risk. Always wear gloves when handling milkweed to minimize exposure!
| Quick Fixes | When to Use |
|---|---|
| Add perlite to soil | For compacted or clay-heavy soil |
| Prune dead flowers | Encourages more blooms (and seeds!) |
| Use raised beds | For areas with poor drainage |
Wrapping up and next steps
Growing milkweed is a rewarding journey—just pair it with the right sunny spots and well-drained soil, and you’ll create a thriving haven for monarch butterflies and pollinators! 🌞 With minimal fuss, you can turn even a small container into a vibrant ecosystem.
Ready to take the next step? Start small: plant a single milkweed in a pot or patch of soil this season, and watch your garden transform into a butterfly magnet!
Pro tip: Document your progress—share your blooms and winged visitors with fellow gardeners for extra inspiration! 🌸