
Fertilization
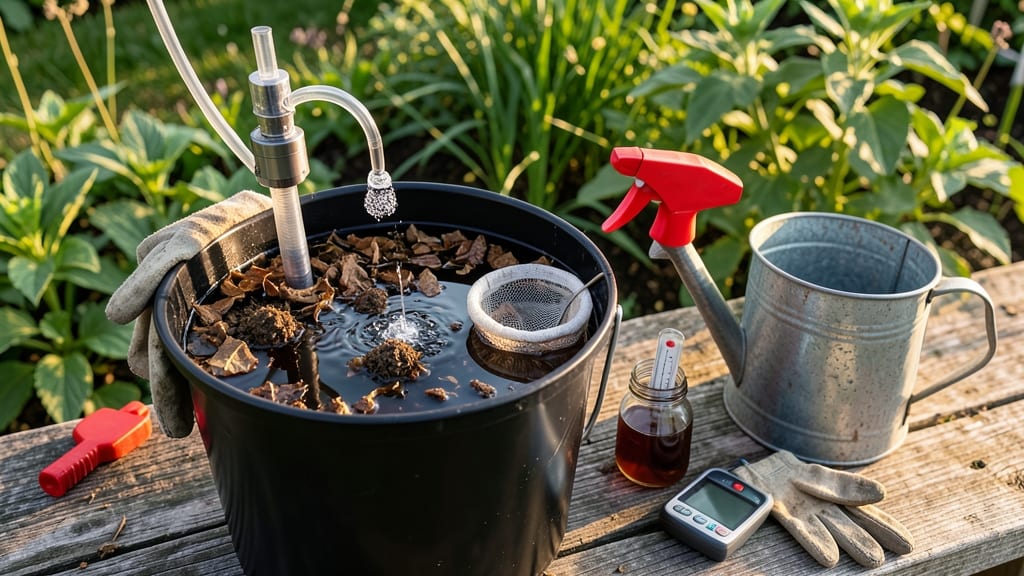
Transforming garden waste into nutrient-packed liquid gold starts with weed compost tea—a process I perfected after struggling with weak soil and stubborn weeds. 🌱 This isn't just another fertilizer; it's a multi-purpose solution that feeds plants while suppressing unwanted growth naturally.
The key lies in balancing decomposition with beneficial microbial activity, turning what would be trash into a powerful garden amendment.
You'll need just five simple ingredients: fresh weeds (non-seeded varieties), water, a container, a breathable bag or burlap sack, and a little patience. The process mimics nature's own composting cycle but accelerates it into a liquid form plants can absorb immediately.
Unlike chemical fertilizers, this tea improves soil structure, enhances root development, and even deters pests—all while being completely organic and safe for edible gardens.
Within 2-4 weeks, you'll have a dark, earthy-smelling brew that smells like rich forest soil after rain. A single application can boost plant vigor for 4-6 weeks, with visible results like deeper green foliage and stronger stems.
The best part? It's a zero-waste solution that puts your garden's natural resources back into the ecosystem where they belong.
Perfect for vegetable gardens, flower beds, or even houseplants—just dilute properly to avoid overfeeding. For those short on time, I'll show you how to speed up the process without compromising quality. Let's get your garden thriving the natural way.
📚 In This Guide
- What you need
- Instructions
- Tips and common mistakes
- Wrapping up and next steps
What you need
- ● Weeds (fresh or dried): 1–2 cups (packed). Choose non-toxic weeds like dandelion, plantain, or clover—avoid anything treated with herbicides or pesticides. ⚠️ Pro Tip: Harvest weeds from organic soil or pesticide-free areas!
- ● Compost: 1–2 cups (well-aged, crumbly texture). Avoid fresh manure or compost with seeds—you don’t want a weed takeover! 😅
- ● Water: 1 gallon (5 liters) of dechlorinated water. Use rainwater, filtered water, or tap water left out for 24 hours to remove chlorine.
- ● Container: A 1–2 gallon bucket or food-grade plastic barrel with a lid. Drill small holes in the lid for aeration if possible.
- ○ Breathing apparatus: An aeration pump (optional but highly recommended) or a fish tank air stone + aquarium pump to oxygenate the tea.
- ● Stirring tool: A wooden stick or plastic spoon (avoid metal to prevent chemical reactions).
- ● Fine mesh bag or cheesecloth: For straining the tea before use.
- ● pH test kit: To check and adjust the tea’s pH (ideal range: 6.0–7.0).
- ● Molasses or unsulfured blackstrap molasses: 1–2 tablespoons per gallon to feed beneficial microbes (boosts fermentation!).
- ● Fish emulsion or seaweed extract: 1 tablespoon per gallon for extra nutrients.
- ● Thermometer: To monitor temperature (ideal: 60–80°F for microbial activity).
- ● Sprayer or watering can: For easy application to plants.
Step-by-step guide to brewing weed compost tea
Here’s how to transform yard waste into nutrient-rich liquid fertilizer—just like the pros do.
🌱 Step 1: Select and Prepare Your Weed Material
Choose weeds without seeds (like dandelion, clover, or grass clippings) and avoid anything treated with herbicides or pesticides. Chop the weeds into ½-inch pieces using pruners or a clean pair of scissors—smaller pieces break down faster and release nutrients more efficiently. I like to use a 5-gallon bucket for brewing, filling it about ⅔ full with the chopped material. This gives enough room for water later without overflow.
For best results, use fresh, green weeds—they’re packed with nitrogen and other nutrients. Yellowed or woody stems decompose slower and won’t contribute as much to the nutrient profile. If your weeds have broad leaves (like plantain or chickweed), include them—they’re nutrient powerhouses. Rinse the material if it’s dusty or dirty, but don’t worry about perfect cleanliness; compost tea thrives on natural microbes.
💧 Step 2: Add Water and Aerate the Mixture
Fill the bucket with dechlorinated water (let tap water sit out for 24 hours to evaporate chlorine, or use rainwater) until it’s ¾ full. The water should cover the weeds completely but leave 1-2 inches of headspace to prevent spills during aeration. Here’s the key part: aeration is non-negotiable. Without it, the tea will stink and breed harmful bacteria instead of beneficial microbes.
Use an aquarium pump with an air stone to bubble air through the mixture for 24-48 hours. The goal is to keep the weeds suspended and oxygen flowing—this mimics the natural breakdown process in a compost pile. You’ll see tiny bubbles rising and the mixture turning darker as nutrients leach out. If the smell is sour or rotten, add a pinch of unsulfured molasses (½ teaspoon per gallon) to feed the beneficial microbes and improve the brew.
☀️ Step 3: Strain and Dilute for Application
After 48 hours, the tea should look like dark, murky liquid with a rich, earthy aroma (think fresh compost, not rotten eggs). Strain it through a fine mesh bag or cheesecloth into a clean container, pressing gently to extract all the liquid. Discard the solid material—it’s spent and can be composted. The strained tea is highly concentrated, so dilute it 1:1 with water (one part tea to one part water) before using.
For foliar feeding, use a 1:2 dilution (one part tea to two parts water) to avoid clogging sprayer nozzles or burning leaves. Apply in the early morning or evening when temperatures are cooler, and avoid spraying when plants are under stress (like during drought or extreme heat). The tea should be used within 24 hours of brewing—its potency fades quickly as microbes die off without fresh oxygen.
✂️ Step 4: Apply to Plants and Monitor Results
Use a sprayer with a fine mist nozzle to apply the diluted tea to soil and foliage. Focus on the base of plants and undersides of leaves where microbes can colonize most effectively. You’ll notice greener leaves and stronger stems within 3-5 days—that’s your sign the nutrients are working. For container plants, water the soil with the tea until it drains through the bottom. For lawns, use a broadcast sprayer and water lightly afterward to help the tea soak in.
Don’t overdo it—once every 2-3 weeks is plenty during the growing season. Too much can lead to salt buildup in the soil or fungal issues if microbes proliferate uncontrollably. If you see white mold on leaves or soil, flush the area with plain water and reduce future applications. The tea should smell earthy and fresh, not putrid. If it does, your aeration wasn’t sufficient—next time, brew with less material or add more molasses to boost good microbes.
⏰ Step 5: Store or Use Immediately
If you brewed more tea than you can use in a day, store the undiluted version in a sealed, airtight container in the fridge for up to 5 days. The cold slows microbial activity, preserving nutrients. Label the container with the date—older tea loses effectiveness and may harbor unwanted bacteria. When ready to use, dilute fresh and apply as directed. Never freeze compost tea; the ice crystals rupture microbial cells, ruining the brew.
For long-term storage, consider making compost tea bags by wrapping strained weed material in cheesecloth and steeping in water for 12-24 hours. These can be hung in watering cans or buried in garden beds to release nutrients slowly. The key to successful compost tea is consistency—stick to the aeration, dilution, and timing, and you’ll see healthier plants, fewer pests, and richer soil in no time.
Tips & tricks for perfect weed compost tea
Here's what I learned after brewing this nutrient gold for years—small details make all the difference.
Weed Selection Wisdom: I've found that young, leafy weeds like plantain and chickweed pack the most nutrients. Avoid anything woody or seed-bearing—those take forever to break down and can actually inhibit microbial activity. Pro tip: Harvest weeds after rain when they're most nutrient-dense. The fresher, the better!
The Aeration Game-Changer: That 24-48 hour aeration window is critical, but here's what nobody tells you—position your air stone at the bottom of the bucket to create a gentle upward flow. This keeps weeds suspended and prevents them from sinking, which creates anaerobic pockets where bad bacteria thrive. I also recommend using a second air stone if possible to ensure even oxygen distribution throughout the entire volume.
Molasses Dosage Secret: The instructions mention ½ teaspoon per gallon of unsulfured molasses, but I've found that 1 teaspoon per gallon works even better for me—just don't exceed 1.5 teaspoons or you'll risk feeding unwanted microbes. Think of it as a microbial energy boost. Add it during the first hour of aeration when microbes are most active and hungry for that quick sugar source.
Storage Hack: When storing your undiluted tea in the fridge for up to 5 days, I've discovered a simple trick to preserve freshness longer. Add a small piece of activated charcoal (about the size of a pea) to the container before sealing. This absorbs any impurities and helps maintain that fresh, earthy aroma. Just remove it before using—it won't dissolve but will keep your tea cleaner and more potent.
Pro Tips for Weed Compost Tea
- Here's what I learned after brewing this nutrient gold for years—small details make all the difference.
- Weed Selection Wisdom: I've found that young, leafy weeds like plantain and chickweed pack the most nutrients.
- The Aeration Game-Changer: That 24-48 hour aeration window is critical, but here's what nobody tells you—position your air stone at the bottom of the bucket to create a gentle upward flow.
Frequently asked questions
Got questions about brewing and using weed compost tea? You’re not alone!
Here are some of the most common queries—plus quick, actionable answers to help you get the most out of your nutrient-rich liquid fertilizer.
How often should I use weed compost tea on my plants?
For most plants, apply weed compost tea every 2–4 weeks during the growing season (spring and summer). Overuse can lead to nutrient imbalances or fungal issues, so start with a weaker brew (1:10 ratio) and monitor your plants’ response. Pro tip: Dilute it further if you notice leaf burn or excessive growth.
How long does it take to make weed compost tea?
Brewing time varies based on the method:
- Aerated tea (best for nutrients): 24–72 hours with constant oxygen (use an aquarium pump).
- Non-aerated tea (simpler, less potent): 1–3 days in a sealed container (stir daily).
- Cold brew (gentler): 1–2 weeks in a cool, dark place.
Test for readiness by smelling—it should have an earthy, fresh scent (not rotten!).
Can I use weed compost tea on edible plants like vegetables or fruits?
Yes, but only if the tea is properly aerated and free of pathogens. Avoid using tea from diseased plants or compost with meat/dairy scraps. For edibles, stick to aerated brews and dilute to 1:10–1:20 ratio to prevent over-fertilization. Pro tip: Use a compost tea tester kit to check for harmful bacteria.
What’s the difference between weed compost tea and regular compost?
While both provide nutrients, compost tea is a liquid concentrate that delivers microbes and nutrients fast (ideal for foliar feeding or soil drenches). Regular compost is a slow-release solid amendment. Tea is great for reviving struggling plants, preventing diseases, and boosting microbial activity, but it’s not a replacement for compost in the long term.
Why did my plants turn yellow or wilt after using weed compost tea?
Yellowing or wilting often signals over-fertilization or microbial imbalance. Common causes:
- Too strong a brew (dilute to 1:10 or less).
- Poorly aerated tea (anaerobic = bad bacteria).
- Salt buildup from concentrated nutrients (flush soil with water).
- Fungal issues (use only fresh, healthy compost and aerate properly).
Fix it: Stop using the tea, water plants with plain water, and let soil recover for 1–2 weeks before retrying a diluted batch.
Wrapping up and next steps
Harnessing the power of weed compost tea is a game-changer for gardeners looking to nourish their plants naturally and sustainably! 🌱 This nutrient-packed elixir transforms garden waste into liquid gold, enriching soil and promoting lush, thriving growth—without breaking the bank.
Whether you're a seasoned green thumb or just starting your gardening journey, this simple recipe is your ticket to healthier plants and a greener thumb.
Now that you’re armed with the knowledge, roll up your sleeves and brew your first batch! Start small, experiment with ratios, and watch your garden flourish. Happy brewing—and may your plants grow wild with vitality! 🌿✨