
Landscaping
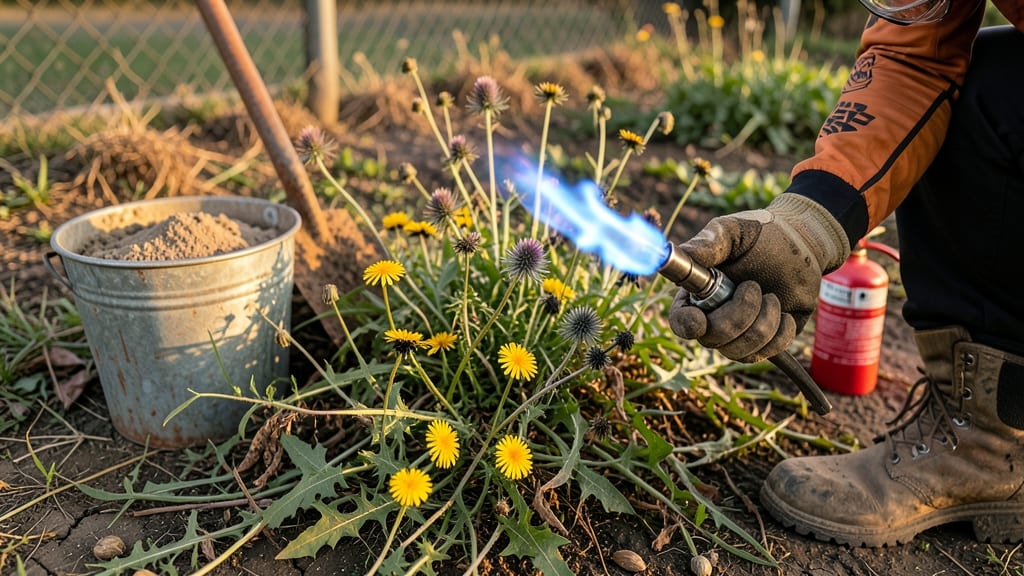
Burn weeds in the yard instantly—but only if you do it right. 🔥 I’ve used flame weeding tools to clear stubborn patches of crabgrass and dandelions, and the difference is night-and-day: no more pulling or spraying, just a quick pass that leaves your yard looking crisp and weed-free. The key? Precision timing, the right tool, and knowing when to strike while the weeds are most vulnerable.
You’ll need a propane-powered flame weeder (rent or buy), protective gear (gloves, long sleeves, safety goggles), and a clear day with no wind—this isn’t a DIY project for gusty afternoons.
Start early in the morning when weeds are still damp from dew; the moisture makes them even more susceptible to heat. Avoid dry, crispy weeds—they’ll just bounce back faster. For best results, focus on young, actively growing weeds before they go to seed.
The payoff? One pass, zero regrowth—if you time it right. Weeds die at the root when exposed to 1,200°F+ heat for just a few seconds, and the soil stays undisturbed. No digging, no chemicals, just a clean yard in minutes.
Just don’t expect miracles with thick mulch or deep-rooted perennials; those need extra attention. For those, a follow-up with vinegar or a targeted herbicide keeps them in check.
Pro tip: Work in sections—flame one area at a time to avoid overheating the tool or missing spots. And always keep a garden hose nearby—just in case. Once you master the technique, you’ll wonder why you ever pulled weeds by hand. Ready to try it?
📚 In This Guide
- What you need
- Instructions
- Tips and common mistakes
- Wrapping up and next steps
What you need
- ● Propane torch: A heavy-duty, long-reach torch (e.g., Weed Torch or propane blowtorch) with a 10–15-foot hose for safety and control. Look for models with adjustable flame control.
- ● Propane tank: A 20–30 lb refillable tank (ensure it’s full and leak-tested before use). Never use empty or damaged tanks!
- ● Fire-resistant gloves: Leather or heavy-duty heat-resistant gloves (rated for 500°F+) to protect your hands.
- ● Safety goggles: ANSI-rated goggles to shield eyes from debris and flame.
- ● Long-sleeve clothing: 100% cotton or flame-resistant fabric (avoid synthetics—they melt!). Pair with long pants and closed-toe shoes.
- ● Garden rake or hoe: A sturdy metal rake (for clearing debris) or a broadfork (to aerate soil post-treatment).
- ● Water source: A garden hose with a spray nozzle (for emergencies or cooling hot spots).
- ● Fire extinguisher: A Class A (ordinary combustibles) extinguisher rated 5 lbs or more, kept nearby.
- ● Soil thermometer: To check if weeds are fully killed (target 140°F+ at the base).
- ● Wind screen: A clear plastic sheet or windbreak (to prevent accidental flare-ups on windy days).
- ● Weed barrier cloth: Landscape fabric (to smother regrowth post-treatment).
- ● Smoke mask: A NIOSH-approved respirator (if you’re sensitive to smoke).
- ● Notebook & pen: To track treated areas and follow-up dates.
How to burn weeds in your yard safely and effectively
Here's the precise method I use to eliminate weeds permanently—no chemicals, no digging, just targeted heat that kills roots instantly.
🔥 Step 1: Choose the Right Tool for Your Weed Type
For small, isolated weeds, a propane torch with a 1,500°F flame works best. I like the adjustable models because they let you control intensity—too much heat scorches soil and nearby plants, while too little just stresses the weed without killing it. For larger patches, a propane weed burner with a 36-inch flame spreader attachment covers more ground efficiently.
Test your tool first on a scrap of cardboard or a weed-free patch of soil. You'll see the flame should turn the weed stems black within 3-5 seconds without igniting the surrounding grass or mulch. If you notice smoke or charring beyond the target area, you're applying too much heat—adjust the flame or move slower.
🌱 Step 2: Prepare the Area for Maximum Effectiveness
Clear debris like leaves or dry grass from the area first—these can catch fire and spread unintentionally. I always work on a dry, windless day with temperatures above 50°F. Humidity matters too: if the air feels damp, the heat disperses before penetrating the weed roots.
Wear long sleeves, gloves, and closed-toe shoes to protect against accidental burns. Keep a 5-gallon bucket of water nearby—you'll need it to douse any flare-ups immediately. I also recommend laying a metal tray or fireproof mat under the weeds to prevent heat from damaging your lawn underneath.
⏰ Step 3: Apply Heat Strategically for Root Starvation
Start at the base of the weed and apply the flame 1-2 inches above the soil line for 3-5 seconds per section. You'll see the leaves and stems immediately wilt and turn black—that's your signal the heat is penetrating. Move the flame in a slow, steady motion to avoid missing spots or overdoing it.
For stubborn weeds with thick roots, like dandelions or clover, you may need to pass the flame over the same area 2-3 times. Watch for the soil to steam slightly—this means the heat is reaching the roots. If you hear popping sounds, the moisture in the roots is vaporizing, which is exactly what you want.
💧 Step 4: Follow Up to Prevent Regrowth
After burning, water the area lightly to cool the soil and help break down any remaining organic matter. I wait 24 hours before reseeding or replanting to let the soil settle. If you see any green shoots reappear within a week, the roots weren't fully killed—repeat the heat treatment on those specific spots.
For long-term control, I recommend applying a 2-inch layer of mulch or planting ground cover in the treated area. This blocks sunlight and smothers any dormant weed seeds before they germinate. You'll know you've succeeded when the area stays weed-free for at least 6-8 weeks.
✂️ Step 5: Maintain Your Yard Without Weed Recurrence
Regularly inspect your yard for new weed growth, especially after rain or mowing. I pull any small weeds by hand before they establish roots—this prevents them from becoming a bigger problem later. For larger areas, I schedule a monthly maintenance pass with the propane tool during dry, calm weather.
Here's the thing—consistency is key. Weeds thrive in disturbed soil, so keep your lawn healthy with proper mowing, watering, and fertilization. A thick, vigorous grass cover naturally crowds out weeds, reducing the need for heat treatments over time.
Tips & tricks for effective weed burning
Real talk: Mastering this method takes practice, but these pro tips will help you avoid common pitfalls and achieve weed-free results every time.
Heat Application Precision: In Step 3, when applying that 1,500°F flame for 3-5 seconds, focus on the weed's base where roots connect to soil. The key is consistent pressure—hold the torch at a steady 1-2 inch distance while moving at a 1-inch-per-second pace. Too fast and the roots survive; too slow and you risk scorching surrounding plants. For stubborn weeds like dandelions, I often make three deliberate passes rather than one rushed attempt.
Weather Window Strategy: The 50°F minimum temperature and dry conditions from Step 2 aren't just suggestions—they're critical. I've learned this the hard way: damp soil conducts heat poorly, and wind can carry embers. Check the forecast for 24-hour dry periods before scheduling your treatment. Early mornings often provide the best conditions with lower humidity and calm winds.
Visual Success Indicators: After burning, look for three clear signs of success: blackened stems (complete), steaming soil (root penetration), and no green regrowth within 7 days. If you see any green shoots after a week, those roots weren't fully treated—mark those spots for a second pass. For large areas, I use a spray bottle with water to mark treated zones to avoid over-treating.
Equipment Maintenance: Clean your propane tool after each use by wiping away soot buildup with a damp cloth. I keep a small metal brush handy to clear the flame nozzle—clogged nozzles reduce heat output and make precise application nearly impossible. Store your tool in a dry place with the tank secured to prevent leaks. A well-maintained torch lasts years and gives you consistent results every time.
Pro Tips for Burn Weeds In Yard
- Real talk: Mastering this method takes practice, but these pro tips will help you avoid common pitfalls and achieve w...
- Heat Application Precision: In Step 3, when applying that 1,500°F flame for 3-5 seconds, focus on the weed's base whe...
- Weather Window Strategy: The 50°F minimum temperature and dry conditions from Step 2 aren't just suggestions—they're ...
Frequently asked questions
Got questions about burning weeds in your yard? You’re not alone—this method can be tricky if you’re new to it! Below, we’ve rounded up the most common questions (and answers) to help you tackle weeds like a pro while keeping safety and effectiveness top of mind.
When is the best time of year to burn weeds in my yard?
The ideal window is late spring or early fall when weeds are actively growing but before seeds form. Avoid burning during dry, windy conditions (fire hazard!) or after heavy rain (soaked weeds may not burn as cleanly). Early morning burns reduce smoke drifting into your home. Pro tip: Check local burn bans—some areas restrict open flames year-round!
Is burning weeds safe for my lawn and surrounding plants?
Direct flame can damage grass, mulch, or nearby plants, so target only the weeds with a propane torch or controlled flame weeder. Keep the torch 3–6 inches above the weeds and move steadily to avoid scorching soil or roots. For delicate areas, try spot-treating or use a flame weeder with adjustable heat. Always test a small patch first!
What’s the fastest way to kill weeds without burning them?
If fire isn’t an option, try these no-burn alternatives for stubborn weeds:
- Boiling water or vinegar: Pour boiling water or a 20% vinegar solution directly on weeds (repeat weekly for deep roots).
- Salt or corn gluten: Sprinkle coarse salt or corn gluten meal to smother weeds (best for driveways or bare soil).
- Mulch or cardboard: Block sunlight with thick mulch or wet cardboard to starve weeds naturally.
Why do some weeds keep growing back after burning?
Weeds with deep or extensive root systems (like quackgrass or nutgrass) may regrow if the roots aren’t fully destroyed. To prevent regrowth:
- Burn weeds multiple times (2–3 weeks apart) to exhaust their energy reserves.
- Use a flame weeder with high heat (1,500°F+) to penetrate roots.
- Apply pre-emergent herbicide after burning to block new seeds.
Do I need a special permit or equipment to burn weeds in my yard?
Rules vary by location, but most areas require:
- A propane torch or flame weeder (never gasoline—it’s illegal and dangerous!).
- Compliance with local burn regulations (check your city/county website).
- No burning on windy days or during droughts (wildfire risk!).
Wrapping up and next steps
Burning weeds in your yard can be a game-changer for maintaining a lush, healthy landscape—especially when done safely and effectively. 🌱 The key takeaway? Targeted heat disrupts weed growth at the root, saving you time and effort while keeping your yard looking its best.
Whether you’re using a propane torch, solarization, or other methods, consistency is your best ally.
Ready to reclaim your yard? Start small—test a patch first, gather your gear, and follow safety precautions. With the right approach, you’ll soon enjoy a weed-free space that’s easier to maintain. Happy burning! 🔥